- Published on
Mario Kart Bike
- Authors

- Name
- elliot plant
- @plant_elliot
When Peleton decided to make a stationary bike with a screen, why didn't they add games? Wouldn't you be more motivated to cycle on Rainbow Road than a virtual spin class? In a very roundabout effort to gamify exercise, I decided to make a stationary bike that acted as a Mario Kart 64 controller.
The Goal
I wanted to play Mario Kart on a stationary bike. I wanted to use the pedals and the handlebars to control the throttle and the steering, respectively, in the game.
Since Mario Kart has an on-or-off throttle, the bike would tell the game to press the throttle if your back wheel is moving faster than a threshold limit. I considered more complex power based throttling, but that turned out to be too expensive. The handlebars would simply correlate to the left-right movement of the analog joystick on the nintendo: rotating the handlebars left would correlate to moving the joystick left on the controller.
I hoped the end product would be a fun way to exercise, but I really just wanted to see if I could make it work at all.
The End Product
In the end, it worked even better than I expected. Each race was a wonderful ~5 minute exercise, and a full "Grand Prix" took about 30 minutes of hard riding. I was both sweating and smiling when I got to the finish line every time. Here’s a video of me riding the bike.
Getting Started
My initial thought was to run the whole operation on a RaspberryPi. I knew you could run a Nintendo 64 emulator through RetroPi, and I figured it wouldn't be too hard to create a out of code. When I got RetroPi running I found that my RaspberryPi 4 with 4gb of ram didn't have the graphics power to run Mario Kart smoothly.
My laptop was able to run Mario Kart without any problems, so I decided I would just create a controller that my laptop could use.
Creating a Controller
Some research showed me that the Teensy had a pre-built joystick mode that might work as a controller out of the box. Since I had worked with Teensys before, I ordered one and tried out the joystick demo. I wrote a simple script to map a physical button to the "A" button on the controller and found that it worked right away. Next, I cut a "controller" out of cardboard and punched holes in it so I could wire more buttons into the Teensy.
 A hacky controller
Obviously the controller was a major hack, but it worked fine for what I needed. Using the left side as the D-Pad buttons, I was able to win a race on Luigi's Raceway.
Steering
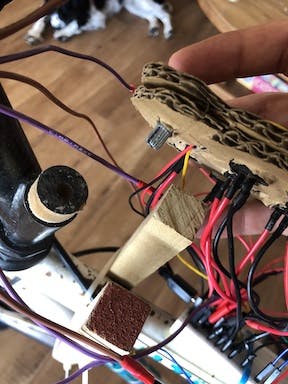
The next problem I faced was using the handlebars to steer the car. I bought a box of potentiometers that I figured I could connect to the steering column, but that turned out to be a lot harder than I expected. First I tried to put the potentiometer directly into the hexagonal socket head on top of the steering column, but that proved to be too loose of a fit to reliably steer the car. In my next attempt, I glued the bottom of one of the knobs that came with the potentiometer onto a small section I cut off of an Allen wrench. The piece of wood fit the potentiometer and didn't slip at all, but when I tried racing, I found that the movement of the wheel on the ground wobbled the bike too much. I would need to separate the handlebars from the front axle to prevent the bike from moving. The bolt I had been using as the base of my potentiometer had to come out so the two could move independently. Unfortunately that put me back at square one with my potentiometer. So I replaced the Allen-wrench joint with a piece of wood I sanded into a press-fit into the steering column tube. I drilled a hole just big enough to press fit the potentiometer into, and that worked perfectly. I was able to steer with the handlebars and the bike didn't wobble at all.
 The steering column
Once I tried racing with my finalized setup, I found that the handlebars weren't nearly sensitive enough. Another difficulty was finding the perfect center point of the potentiometer so the car wouldn't drift to one side right after starting out. To fix the drift, I wrote some code to establish the left and write bounds of the handlebars for the duration of the ride.
Throttling
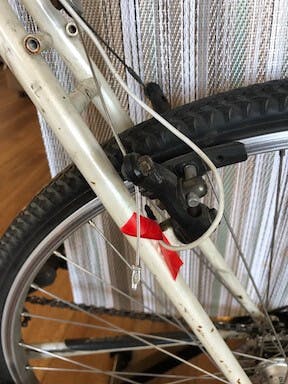
Finally, I got to the exercise portion of the project. I found a cheap rear wheel resistance mount on craigslist that held the bike nicely in place. I hooked up a Hall effect sensor near the rear wheel, and connected a magnet to one of the spokes. After measuring the sensor's voltage for a few passes, I wrote a script to determine whether or not the rider was moving faster than a constant threshold. Next, I connected that script to the main controller code so that the controller would signal the "A" button to be pressed when the cyclist was moving.
 How to measure RPMs
Shooting Shells
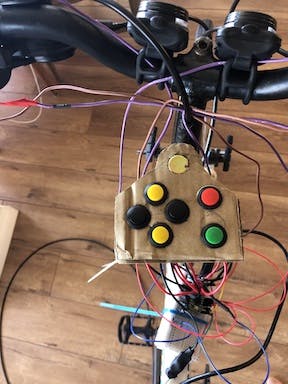
Of course the reason Mario Kart is more fun than a regular Peleton is because you can shoot shells at the other racers. So I added 4 more buttons: left trigger, right trigger, Z, and B, so you could bounce, bounce, shoot, and brake. I added cardboard mounts to the handlebars and wired the buttons up to the Teensy, and they worked like a charm.
 Thumb buttons
Fragility
Given that most of the project was held together with literal tape and cardboard, I didn't expect it to stand up to the pressures of cycling. But after a few rides without breaking, I was pleased with the result. Unfortunately the tangled mess of wires and the major modifications to the bike make it difficult to add and remove from what would otherwise be my daily rider. I have dreams of making everything a bit sturdier and more replacable, but that's a project for another day.
Thanks
Teensy did most of the heavy software lifting for me, so I owe PJRC a lot of thanks. Also, my dad gave be some great advice on how to get the steering column to work the way I wanted it to. Thanks dad.